Now, let's get back to business. Today we are finishing up by setting a manual white balance for a raw file using Bibble 4.10 Pro.

The Manual Controls
Like most other raw processing software, Bibble offers two controls for altering the white balance manually. One is Temperature and the other is Tint (circled at the lower right of the image).
Temperature shifts the color from warm to cool (essentially from red to blue). It displays an approximate color temperature, which should match the temperature of the light source once a proper white balance is achieved.
Tint shifts the color between green and magenta, and is used to level the RGB values after the color temperature has been set. This is needed because the variability in spectral content between light sources.
Adjusting the White Balance
So let's take a look at how we can set the white balance manually with Bibble 4.10. In the first image we were looking at the shot of the white balance card from earlier in this series. The light source was tungsten, so the appearance is heavily biased toward red (the color temperature is very warm).
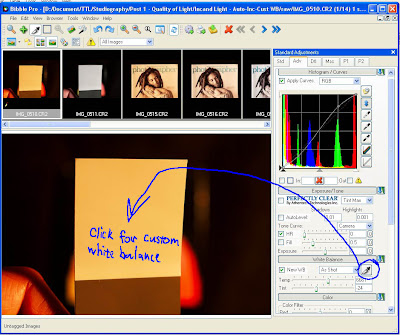 We begin the process of finding the white balance by setting an auto white balance with the eyedropper tool. This gets us very close to pure white (why doesn't it get perfect white Bibble Labs?).
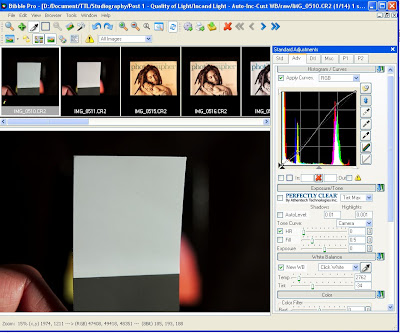 Next we move the temperature adjustment slider until the white patch appears close to white. Measurements are taken by simply moving the cursor over the white patch. Note that the measurements will vary a little from spot to spot, but one quickly gets an idea of just how close to a neutral white the color is getting. Remember that neutral will be when all three of the RGB values are identical (or in this case, close).
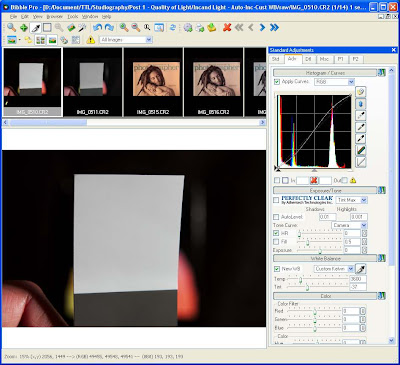 The RGB reading of 185, 193, 188 indicates a bit too much green and not enough red. Since I know the light source is Tungsten, which should be closer to 3300 K, I moved the temperature slider a little bit to the right to warm things up a bit. This improved the situation to give 194, 192, 195, and that is plenty good, but just a slight tweak of tint to the left toward green brought the color sample to 193, 193, 193 (at least on that one spot). Getting a perfect reading borders on obsessive compulsive, so don't get carried away with this like I do.
Copying White Balance Settings
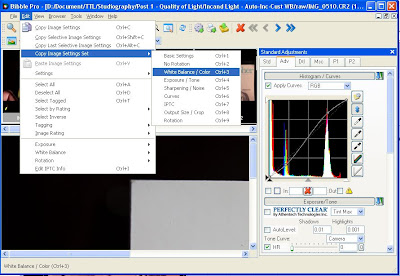 At the end of the day the color balance is effectively perfect. Now you can use Bibble's “Copy Image Setting Set” function to copy “White Balance / Color” (Ctrl+3) and then use paste (Ctrl+V) to paste the white balance into all of the images shot under the same lighting. You can select multiple files (Click 1st, then Shift+Click last) or all files (Ctrl+A) and then paste the settings into all selected files.
 Saving and Reusing Image Settings
You can also save the settings and reuse them later, select Edit then Settings then Save Image Settings (Ctrl+Shift+S). Give the settings a name and browse to where you want them saved.
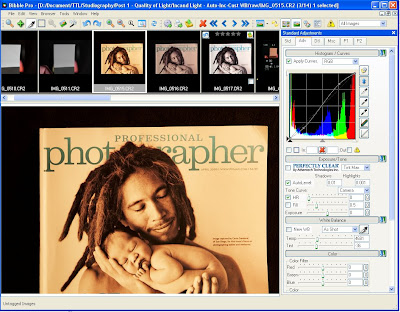 Since I have a photo handy that was taken under the same lighting as the white patch, I want to apply my saved settings to it. I click on the photo in Bibble to select it, and then to make use of the saved settings, select the Edit menu and then Settings and then Load Image Setting (Ctrl+Shift+L). Browse to the saved settings and click Open to apply the settings to the file.
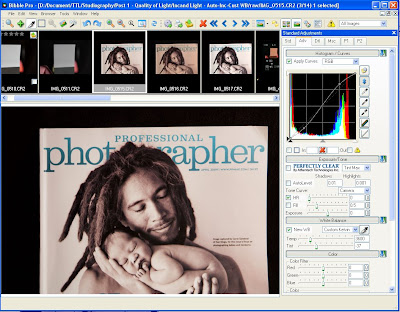 The file has inherited the saved settings and the result is a perfectly white balanced image.
If there are several for which you want to apply the same settings, this can be done the same way by first selecting all of the files to which you wish to apply settings.
Coming Next
I'm not sure what is next, but have been thinking about a number of smaller projects to share, and I promise it will not be so long before the next posting... for sure! Until then...
-Gene


No comments:
Post a Comment
Your comments are greatly appreciated, but please be kind. Kudos are always welcome! Please note that due to comment spamming, all comments are moderated, so it may take a little while before yours appears on the page.